External parameters
Environments provide context for the application to run in. Parameters express the ability to ask for an external value when running the app. Parameters can be used to provide values to the app when running locally, or to prompt for values when deploying. They can be used to model a wide range of scenarios including secrets, connection strings, and other configuration values that might vary between environments.
Parameter values
Parameter values are read from the Parameters section of the AppHost's configuration and are used to provide values to the app while running locally. When you run or publish the app, if the value isn't configured you're prompted to provide it.
Consider the following example AppHost AppHost.cs file:
var builder = DistributedApplication.CreateBuilder(args);

// Add a parameter named "example-parameter-name"
var parameter = builder.AddParameter("example-parameter-name");

builder.AddProject<Projects.ApiService>("api")
       .WithEnvironment("ENVIRONMENT_VARIABLE_NAME", parameter);
The preceding code adds a parameter named example-parameter-name to the AppHost. The parameter is then passed to the Projects.ApiService project as an environment variable named ENVIRONMENT_VARIABLE_NAME.
Configure parameter values
Adding parameters to the builder is only one aspect of the configuration. You must also provide the value for the parameter. The value can be provided in the AppHost configuration file, set as a user secret, or configured in any other standard configuration. When parameter values aren't found, they're prompted for when you run or publish the app.
Consider the following AppHost configuration file appsettings.json:
{
  "Parameters": {
    "example-parameter-name": "local-value"
  }
}
The preceding JSON configures a parameter in the Parameters section of the AppHost configuration. In other words, that AppHost is able to find the parameter as it's configured. For example, you could walk up to the IDistributedApplicationBuilder.Configuration and access the value using the Parameters:example-parameter-name key:
var builder = DistributedApplication.CreateBuilder(args);

var key = $"Parameters:example-parameter-name";
var value = builder.Configuration[key]; // value = "local-value"
Caution
However, you don't need to access this configuration value yourself in the
AppHost. Instead, the ParameterResource is used to pass the parameter value
to dependent resources. Most often as an environment variable.
Set parameter values using environment variables
Parameters can be set using environment variables, which is particularly useful in CI/CD pipelines and deployment scenarios. The environment variable name follows the pattern Parameters__{parameter_name}, using double underscores (__) to separate the configuration section from the parameter name and a single underscore to represent dashes.
Note
The double underscore (__) syntax is a standard .NET configuration
convention for representing nested configuration keys in environment
variables, where colons (:) in configuration paths are replaced with double
underscores.
Consider the following example AppHost AppHost.cs file:
var builder = DistributedApplication.CreateBuilder(args);

// Define container registry parameters
var endpoint = builder.AddParameter("registry-endpoint");
var repository = builder.AddParameter("registry-repository");

builder.AddContainerRegistry("container-registry", endpoint, repository);

builder.Build().Run();
These parameters can be provided via environment variables:
Parameters__registry_endpoint- Registry URL (e.g.,ghcr.io)Parameters__registry_repository- Repository path (e.g.,username/reponame)
Example: GitHub Actions workflow
The following example shows how to set parameters as environment variables in a GitHub Actions workflow:
- name: Login to GHCR
  uses: docker/login-action@v3
  with:
    registry: ghcr.io
    username: ${{ github.actor }}
    password: ${{ secrets.GITHUB_TOKEN }}

- name: Push images with Aspire
  env:
    Parameters__registry_endpoint: ghcr.io
    Parameters__registry_repository: your-org/your-repo
  run: aspire do push
How parameters are resolved
Aspire resolves parameter values in the following order:
- 1
Environment variables - Values set using the
Parameters__*syntax - 2
Configuration files - Values from appsettings.json, user secrets, or other configuration sources
- 3
User prompts - If no value is found, the dashboard or CLI prompts for the value
This resolution order allows you to override configuration file values with environment variables, making it easy to adapt your application to different environments without modifying configuration files.
Prompt for parameter values in the dashboard
If your code adds parameters but doesn't set them, you'll see a prompt to configure their values in the Aspire dashboard. The Unresolved parameters message appears, and you can select Enter values to resolve the problem:

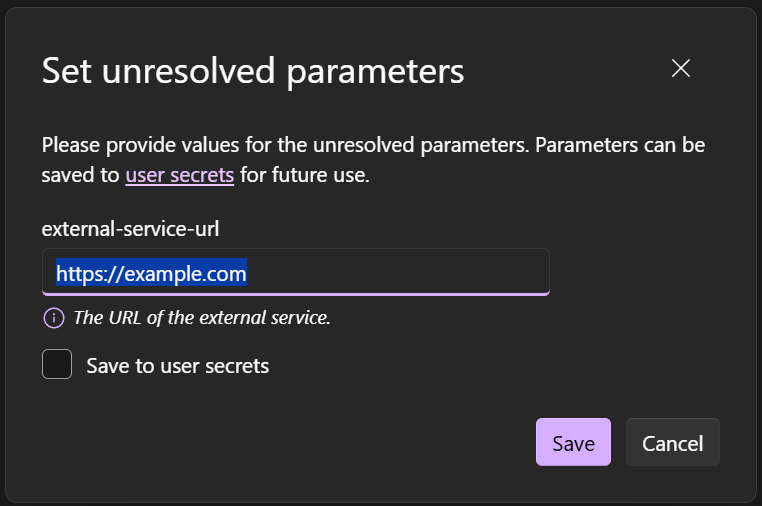
When you select Enter values, Aspire displays a form that you can use to configure values for each of the missing parameters.
You can also control how the dashboard displays these parameters, by using these methods:
WithDescription: Use this method to provide a text description that helps users understand the purpose of the parameter. To provide a formatted description in Markdown, use theenableMarkdown: trueparameter.WithCustomInput: Use this method to provide a callback method that customizes the parameter dialog. For example, in this callback you can customize the default value, input type, label, and placeholder text. When usingWithCustomInput, you must copy theEnableDescriptionMarkdownproperty from the parameter to theInteractionInputobject to preserve markdown rendering.
This code shows how to set a description and use the callback:
var builder = DistributedApplication.CreateBuilder(args);

#pragma warning disable ASPIREINTERACTION001 // Type is for evaluation purposes only and is subject to change or removal in future updates. Suppress this diagnostic to proceed.
var externalServiceUrl = builder.AddParameter("external-service-url")
    .WithDescription("The URL of the external service. See [example.com](https://example.com) for details.", enableMarkdown: true)
    .WithCustomInput(p => new()
    {
        InputType = InputType.Text,
        Value = "https://example.com",
        Name = p.Name,
        Placeholder = $"Enter value for {p.Name}",
        Description = p.Description,
        EnableDescriptionMarkdown = p.EnableDescriptionMarkdown
    });
var externalService = builder.AddExternalService("external-service", externalServiceUrl);
#pragma warning restore ASPIREINTERACTION001

builder.Build().Run();
The code renders this control in the dashboard:
[!CAUTION] WithCustomInput is an experimental API The
WithCustomInputmethod uses the experimental interaction service APIs, which are marked with the[Experimental("ASPIREINTERACTION001")]attribute. If you haveTreatWarningsAsErrorsenabled (or prefer warning-free builds), suppress this warning with#pragma warning disable ASPIREINTERACTION001when using the API. TheWithDescriptionmethod is not experimental and doesn't require this pragma. For more information about the diagnostic and other ways to suppress it, see ASPIREINTERACTION001.
Note
When using WithCustomInput, the InteractionInput object you create replaces the default input generation. To preserve markdown rendering in the parameter dialog, copy EnableDescriptionMarkdown = p.EnableDescriptionMarkdown from the parameter. The enableMarkdown: true parameter in WithDescription sets this property on the parameter resource, but you must explicitly copy it to your custom InteractionInput object.
Note
The dashboard parameter dialog includes a Save to user secret checkbox. Select this option to store sensitive values in your AppHost's user secrets for extra protection. For more information about secret parameter values, see Secret values.
Secret values
Parameters can be used to model secrets. When a parameter is marked as a secret, it serves as a hint to the deployment system that the value should be treated as a secret. When you publish the app, the value is prompted for and stored in a secure location. When you run the app locally, the value is read from the Parameters section of the AppHost configuration.
Consider the following example AppHost AppHost.cs file:
var builder = DistributedApplication.CreateBuilder(args);

// Add a secret parameter named "secret"
var secret = builder.AddParameter("secret", secret: true);

builder.AddProject<Projects.ApiService>("api")
       .WithEnvironment("SECRET", secret);

builder.Build().Run();
Now consider the following AppHost configuration file appsettings.json:
{
  "Parameters": {
    "secret": "local-secret"
  }
}
The manifest representation is as follows:
{
  "resources": {
    "value": {
      "type": "parameter.v0",
      "value": "{value.inputs.value}",
      "inputs": {
        "value": {
          "type": "string",
          "secret": true
        }
      }
    }
  }
}
Add parameters from configuration
In some scenarios, you might want to read parameter values directly from a specific configuration key rather than following the standard Parameters:* pattern. The AddParameterFromConfiguration method allows you to specify a custom configuration key for a parameter.
API signature
public static IResourceBuilder<ParameterResource> AddParameterFromConfiguration(
    this IDistributedApplicationBuilder builder,
    string name,
    string configurationKey,
    bool secret = false
);
Parameters
name- The name of the parameter resourceconfigurationKey- The configuration key to read the value fromsecret- Optional flag indicating whether the parameter should be treated as a secret (default:false)
Example usage
Consider a scenario where you have configuration values stored in a custom section:
var builder = DistributedApplication.CreateBuilder(args);

// Read from a custom configuration key
var dbPassword = builder.AddParameterFromConfiguration(
    "db-password",
    "CustomConfig:Database:Password",
    secret: true);

builder.AddProject<Projects.ApiService>("api")
       .WithEnvironment("DB_PASSWORD", dbPassword);

builder.Build().Run();
The corresponding configuration file would look like:
{
  "CustomConfig": {
    "Database": {
      "Password": "your-secure-password"
    }
  }
}
This method is useful when:
- You need to integrate with existing configuration structures
- Your configuration follows a different pattern than the standard
Parameters:*convention - You want to read values from specific configuration sections
Connection string values
Parameters can be used to model connection strings. When you publish the app, the value is prompted for and stored in a secure location. When you run the app locally, the value is read from the ConnectionStrings section of the AppHost configuration.
Always use AddParameter to pass secrets to resources. Never include passwords or other sensitive data like connection strings in source code.
If you're connecting to a local database, and want to use Integrated Security or passwordless authentication, you don't need to worry about securing your connection strings. If you're using a password, store the connection string securely using app secrets.
Consider the following example AppHost AppHost.cs file:
var builder = DistributedApplication.CreateBuilder(args);

var redis = builder.AddConnectionString("redis");

builder.AddProject<Projects.WebApplication>("api")
       .WithReference(redis)
       .WaitFor(redis);

builder.Build().Run();
Note
Using WaitFor with a connection string will implicitly wait for the resource
that the connection string connects to.
Now consider the following AppHost configuration file appsettings.json:
{
  "ConnectionStrings": {
    "redis": "local-connection-string"
  }
}
Build connection strings with reference expressions
If you want to construct a connection string from parameters and ensure that it's handled correctly in both development and production, use AddConnectionString with a ReferenceExpression.
For example, if you have a secret parameter that stores a small part of a connection string, use this code to insert it:
var secretKey = builder.AddParameter("secretkey", secret: true);

var connectionString = builder.AddConnectionString(
    "composedconnectionstring",
    ReferenceExpression.Create($"Endpoint=https://api.contoso.com/v1;Key={secretKey}"));

builder.AddProject<Projects.AspireReferenceExpressions_CatalogAPI>("catalogapi")
       .WithReference(connectionString)
       .WaitFor(connectionString);
You can also use reference expressions to append text to connection strings created by Aspire resources. For example, when you add a PostgreSQL resource to your Aspire solution, the database server runs in a container and a connection string is formulated for it. In the following code, the extra property Include Error Details is appended to that connection string before it's passed to consuming projects:
var postgres = builder.AddPostgres("postgres");
var database = postgres.AddDatabase("db");

var pgConnectionString = builder.AddConnectionString(
    "pgdatabase",
    ReferenceExpression.Create($"{database};Include Error Details=true"));

builder.AddProject<Projects.AspireReferenceExpressions_CustomerAPI>("customerapi")
       .WithReference(pgConnectionString)
       .WaitFor(pgConnectionString);
Parameter example
To express a parameter, consider the following example code:
var builder = DistributedApplication.CreateBuilder(args);

var db = builder.AddSqlServer("sql")
                .PublishAsConnectionString()
                .AddDatabase("db");

var insertionRows = builder.AddParameter("insertionRows");

builder.AddProject<Projects.Parameters_ApiService>("api")
       .WithEnvironment("InsertionRows", insertionRows)
       .WithReference(db);

builder.Build().Run();
The following steps are performed:
- 1
Adds a SQL Server resource named
sqland publishes it as a connection string. - 2
Adds a database named
db. - 3
Adds a parameter named
insertionRows. - 4
Adds a project named
apiand associates it with theProjects.Parameters_ApiServiceproject resource type-parameter. - 5
Passes the
insertionRowsparameter to theapiproject. - 6
References the
dbdatabase.
The value for the insertionRows parameter is read from the Parameters section of the AppHost configuration file appsettings.json:
{
  "Logging": {
    "LogLevel": {
      "Default": "Information",
      "Microsoft.AspNetCore": "Warning",
      "Aspire.Hosting.Dcp": "Warning"
    }
  },
  "Parameters": {
    "insertionRows": "1"
  }
}
The Parameters_ApiService project consumes the insertionRows parameter. Consider the Program.cs example file:
using Microsoft.EntityFrameworkCore;

var builder = WebApplication.CreateBuilder(args);

int insertionRows = builder.Configuration.GetValue<int>("InsertionRows", 1);

builder.AddServiceDefaults();

builder.AddSqlServerDbContext<MyDbContext>("db");

var app = builder.Build();

app.MapGet("/", async (MyDbContext context) =>
{
    // You wouldn't normally do this on every call,
    // but doing it here just to make this simple.
    context.Database.EnsureCreated();

    for (var i = 0; i < insertionRows; i++)
    {
        var entry = new Entry();
        await context.Entries.AddAsync(entry);
    }

    await context.SaveChangesAsync();

    var entries = await context.Entries.ToListAsync();

    return new
    {
        totalEntries = entries.Count,
        entries
    };
});

app.Run();